
Tools Needed
- Screwdriver (probably Phillips, but yours may require a flathead or a ¼” nut driver)
- Wire cutter & stripper

Materials Needed:
- Wire nuts (Ideal 73B orange were used here)
- Replacement ballast
Fluorescent Light Ballast Replacement
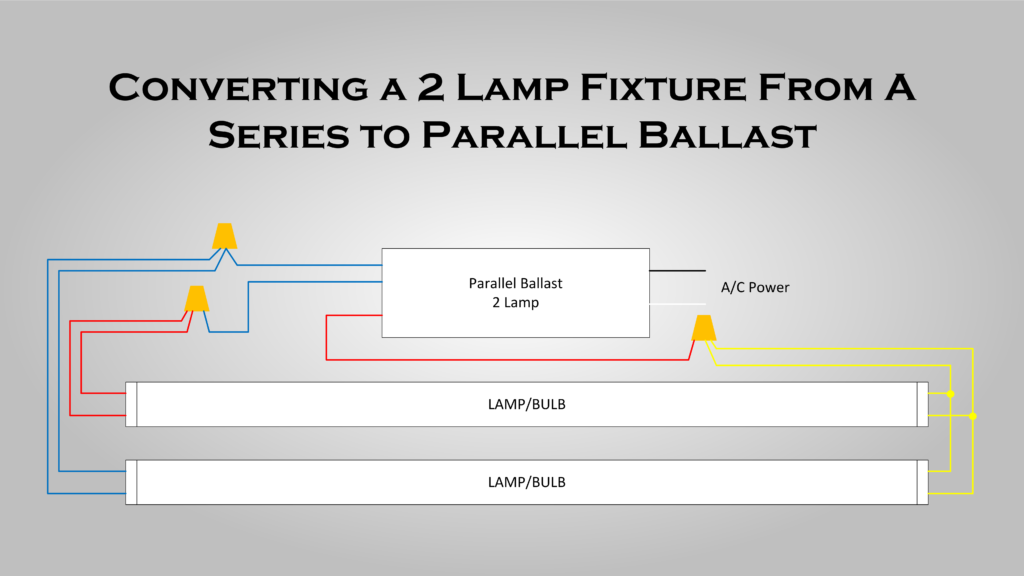
Welcome to a how-to video by Toolbox DIY where will we show you how to replace a fluorescent ballast on a light fixture. The fixture here uses a 2-bulb series ballast that gets replaced with a 2-bulb parallel ballast.
DIY or Electrician?
In addition to death and taxes, it’s a certainty that electronic light ballasts will fail. You can always hire an electrician to replace it (and you may live somewhere that requires that), but replacing it yourself is not difficult.
(Don’t want to replace a ballast? Click here to learn how to convert to LED!)
Chris demonstrates how to replace a fluorescent ballast in this video. Specifically, how to replace a series ballast with a parallel ballast. Replacing your ballast is quite simple and should only require about 10-15 minutes of your time. In this video, we review choosing the right size ballast and then demonstrate how to replace it. It’s done in these easy steps:
- Turn off the lighting circuit at the breaker box.
- Remove the bulbs and any reflectors or covers that may be hiding the ballast.
- Disconnect the a/c wiring from the existing ballast and cut the wires going from the ballast to the lamp holders.
- Remove the old ballast by unscrewing the mounting screws.
- Install the new ballast and secure it with the old mounting screws.
- Cut the new wires to length and then connecting them accordingly (see diagrams) with wire nuts.
- Reconnect the a/c wires coming from the circuit.
- Reinstall any reflectors or ballast covers, reinstall the bulbs (you may need new bulbs if the bad ballast burned out the bulbs), turn back on the circuit at the breaker box and you’re done!
Here’s a helpful diagram to use when converting from a series ballast to a parallel:
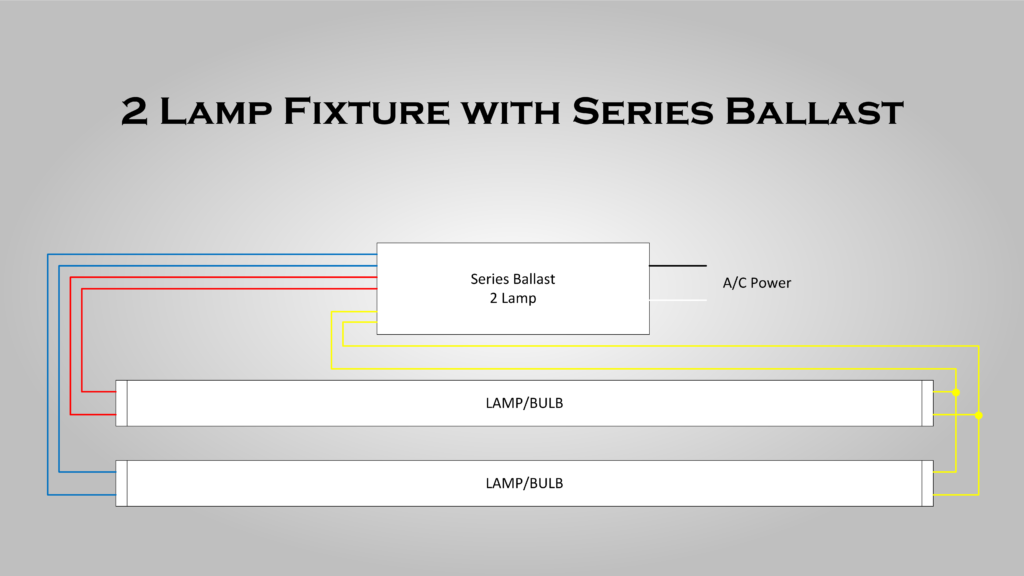
Additional Wiring Diagrams
If you are replacing a series with a series ballast or a parallel with a parallel ballast, the steps are the same, but the wiring connections are different. These diagrams will help you understand how they should be wired.
PLEASE, always check your local codes and ordinances to determine if you are allowed to perform this type of work or if you need a permit to do so. Working with electricity can be inherently dangerous and should only be done by a qualified person.


